
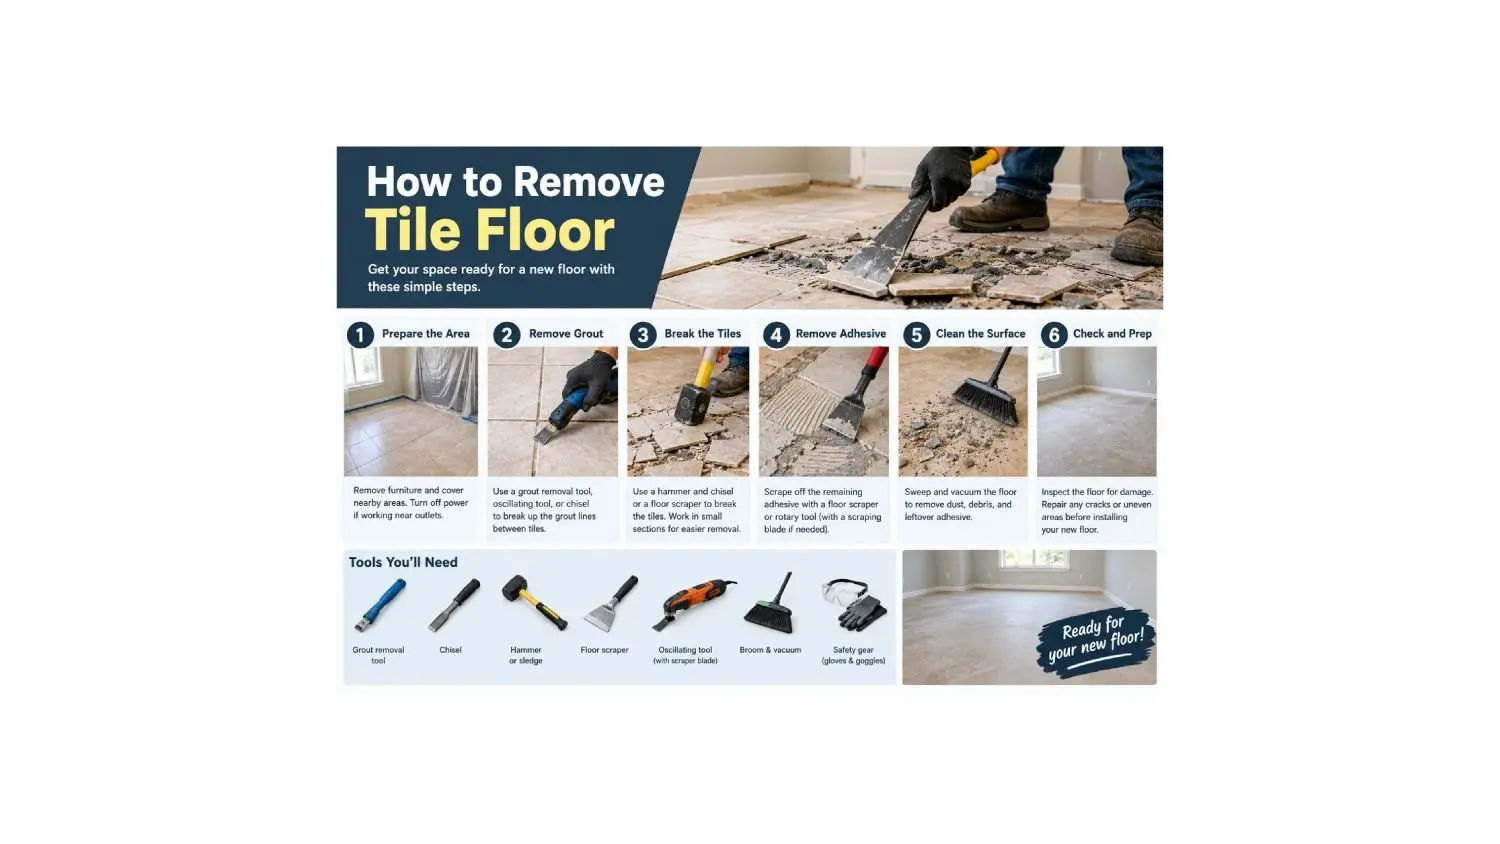
How to Remove Tile Floor? Best Tools, Methods, and Step-by-Step Guide
Old, cracked, or outdated tile can drag down the look of a whole room. The good news is that you don’t always need to hire a crew to tear it out. With the right tools, safety gear, and a solid plan, many homeowners can remove a tile floor themselves in a day or two. But tile removal is loud, dusty, and hard work, and doing it the wrong way can damage the subfloor underneath. Picking the right method for your floor makes the job faster, safer, and much less frustrating.
In this guide, we explain how to remove tile floor in plain, simple words. You’ll learn which tools work best, from a basic hammer and chisel to a rented power scraper, and when each one makes sense. We’ll walk you through every step, including how to remove tile from concrete and from wood subfloors, and how to get rid of leftover thinset and adhesive. You’ll also see costs for DIY vs. hiring a pro, safety warnings about asbestos and silica dust, and common mistakes to avoid. By the end, you’ll know exactly how to tackle your tile floor and get it ready for new flooring.
Quick answer: To remove a tile floor, (1) clear the room, seal off doorways, and put on safety glasses, gloves, a dust mask or respirator, and hearing protection, (2) remove baseboards, toilets, and trim, (3) break out a starting tile with a hammer and chisel, (4) work under the edges of the next tiles with a chisel or floor scraper to pop them loose, using a rented rotary hammer or power scraper for big rooms, (5) remove or grind off the leftover thinset, adhesive, or backer board, and (6) clean up and check that the subfloor is flat before laying new flooring. If your tile or its adhesive may be from before the 1980s, test for asbestos first.
Before You Start: Safety First
The first rule of how to remove tile floor safely is to protect yourself. Tile removal creates flying shards, heavy dust, and loud noise. Take these steps before you swing a hammer.
Check for Asbestos
Some older floor tiles, especially 9-by-9-inch vinyl or asphalt tiles, and some black “cutback” adhesive and mastic used under tile, contain asbestos. It was common in homes built or remodeled before the 1980s. Breaking, sanding, or grinding these materials can release dangerous fibers. If your floor might be that old, have a sample tested by an accredited lab before you start. If it tests positive, hire a licensed abatement contractor. Rules vary by state and city, so check local requirements.
Control Silica Dust
Ceramic tile, porcelain tile, grout, thinset, and concrete contain silica. Grinding and chipping them creates fine dust that can harm your lungs. OSHA has strict silica dust rules for workers for this reason. At home:
- Wear an N95 mask at minimum, and a P100 respirator for grinding.
- Use tools with dust shrouds hooked to a HEPA shop vacuum.
- Lightly mist the floor with water when chipping to keep dust down (never when using non-wet-rated power tools).
- Seal doorways with plastic sheeting and turn off your HVAC system so dust doesn’t spread through the house.
Wear the Right Gear
- Safety glasses or goggles (tile chips fly fast and sharp)
- Thick work gloves
- Long sleeves and long pants
- Hearing protection
- Knee pads
- Steel-toe or sturdy boots
Watch for Hidden Hazards
- Radiant floor heating: Electric heat mats or water tubes may be in the thinset under the tile. Turn off power to heated floors at the breaker and work carefully if you plan to keep the system.
- Pipes and wires: Be careful when cutting into a wood subfloor.
- Lead paint: Baseboards and trim in older homes may have lead paint.
Best Tools to Remove Tile Floor: Compared
Choosing the right tool is the biggest part of how to remove tile floor quickly. The right tool depends on how big the room is, what’s under the tile, and how well it’s stuck down. Here’s how the main options compare.
| Tool | Best for | Speed | Effort | Rough cost |
|---|---|---|---|---|
| Hammer and cold chisel | Small areas, single tiles, edges | Slow | High | About $15 to $40 to buy |
| Long-handled floor scraper | Small to medium rooms; loose tiles | Medium | Medium to high | About $25 to $60 to buy |
| SDS-plus rotary hammer with chisel/scraper bit | Medium rooms; most DIY jobs | Fast | Medium | About $40 to $80 per day to rent; $100+ to buy |
| Demolition hammer (larger electric) | Thick mortar beds; large rooms | Fast | Medium | About $60 to $100 per day to rent |
| Walk-behind or ride-on power floor scraper | Large areas; commercial-size jobs | Fastest | Low | About $100 to $200+ per day to rent |
| Angle grinder with diamond cup wheel + dust shroud | Grinding off thinset and adhesive | Medium | Medium | About $50 to $150, plus wheel |
| Oscillating multi-tool with grout blade | Removing grout around a single tile | Slow | Low | About $50 to $150 |
Rough price ranges. Rental prices vary by store and region.
Our pick for most homeowners: A rented SDS-plus rotary hammer with a wide tile-chisel or scraper bit. It’s light enough to handle, fast, and does most bathroom and kitchen floors in a day. Use hand tools for edges and corners.
Tips From Pros and Experienced DIYers
- Power tools save your body and your floor. A longtime renovation contractor explains that a rotary hammer in demolition mode with a flat spade bit keeps you working efficiently all day and actually puts less force into the floor than pounding with a hammer.
- Keep the bit sharp. A dull chisel bit bounces instead of sliding under tile. Pros sharpen bits on a grinder, using light passes so the tip doesn’t overheat and lose its hardness.
- For big concrete floors, some pros use an air chisel with a wide blade, a long-handled “pole” chipper, or a rented electric jackhammer on a wheeled cart, which lets you work standing up.
- For newer tile with grout, cutting out the grout lines first with an oscillating tool or thin grinder blade, then prying, can help tiles come up in bigger pieces.
Other Tools and Supplies You’ll Need
- Pry bar and flat bar (for baseboards and backer board)
- Utility knife
- Square-nose shovel
- Heavy-duty contractor bags or 5-gallon buckets
- Wheelbarrow, if you’re hauling a lot of debris
- Shop vacuum with HEPA filter
- Plastic sheeting and painter’s tape
- Drill/driver for screws in backer board
- Circular saw or oscillating tool, if cutting out subfloor sections
How to Remove Tile Floor: Step-by-Step
Here’s how to remove tile floor from start to finish.
Step 1: Clear and Prep the Room
- Move all furniture and rugs out of the room.
- Remove the toilet, vanity, or appliances if they sit on the tile. Turn off water and plug the drain opening with a rag to block sewer gas and keep debris out.
- Remove floor vent covers and cover the openings.
- Seal doorways and openings with plastic sheeting and tape. Cover heating and cooling vents with plastic wrap and painter’s tape so dust doesn’t spread through your ductwork.
- Turn off the HVAC system while you work.
- Cover nearby cabinets and tubs with cardboard or drop cloths to protect them from flying chips.
Step 2: Remove Baseboards and Trim
Score the caulk or paint line along the top of baseboards with a utility knife. Gently pry them off with a flat bar, using a scrap of wood behind the bar to protect the wall. Label the pieces if you plan to reuse them. Remove door thresholds and transition strips too.
Step 3: Find a Starting Point
Start where tile is already cracked or loose, at a doorway, or along an edge. If every tile is solid, break one in the center by striking it with a hammer (cover it with a towel to keep chips from flying). Then chip out the pieces with a chisel to create an opening.
Step 4: Pop the Tiles Loose
This is the heart of how to remove tile floor. Once you have an opening, work under the edge of the next tile:
- By hand: Set the chisel at a low angle (about 30 to 45 degrees) under the edge of the tile, where the tile meets the thinset, and strike it with the hammer. Work your way across the floor row by row.
- With a floor scraper: Push the blade under the tile edges with firm, short jabs. A long handle saves your back and knees.
- With a rotary hammer: Set it to “hammer only” (no rotation). Hold the bit at a low angle and let the tool do the work, moving under the tiles. Don’t push down hard, or you’ll gouge the subfloor.
Old-school tip: A wide brick chisel, called a bolster, works well by hand. Smash the first tile, then drive the bolster under the edges of the next tiles. On some floors, especially older ones with weak bonds, many tiles come up in one piece.
Some tiles will pop off whole. Others will shatter. Both are fine if you’re not saving them. Clear debris often so you can see what you’re doing and don’t trip.
Step 5: Remove the Tile Underlayment, If There Is One
What’s under your tile decides the next step:
- Thinset directly on concrete: Go to Step 6 to remove leftover thinset.
- Cement backer board on a wood subfloor: Backer board is usually screwed or nailed down over a layer of thinset. Find the fasteners, remove what screws you can, then pry the boards up with a flat bar or pry bar. It’s often easiest to remove the tile and backer board together in chunks.
- Thick mortar bed (“mud bed”): Older homes may have 1 to 2 inches of mortar, sometimes with wire mesh in it. In some very old bathrooms, the mud bed can be 4 to 5 inches thick. A demolition hammer and bolt cutters for the mesh make this job much easier, but a very thick bed is often a job for a pro.
- Uncoupling membrane: Plastic membranes can usually be scraped up with a floor scraper after the tile comes off.
Step 6: Remove Thinset, Mortar, or Adhesive
Many guides on how to remove tile floor stop at the tile, but the leftover thinset matters just as much. For your new floor to sit flat, the surface must be smooth. Options include:
- Scraping: A floor scraper or rotary hammer with a wide scraping bit knocks off most thinset ridges.
- Grinding: An angle grinder with a diamond cup wheel and a dust shroud connected to a HEPA vacuum gets concrete smooth. For big areas, rent a floor grinder.
- Self-leveling compound: If a little thinset remains on concrete, you may be able to pour self-leveler over it instead of grinding everything off. Check your new flooring’s requirements first.
- Mastic glued straight to plywood: This is one of the hardest cases. The glue often pulls up wood fibers. If the plywood gets torn up, add a new layer of underlayment plywood before installing new flooring.
- Mastic (organic adhesive): Soften it with warm water or a citrus-based adhesive remover and scrape. Never sand or grind black adhesive until it’s been tested for asbestos.
Step 7: Clean Up and Inspect the Subfloor
- Shovel debris into heavy-duty contractor bags or 5-gallon buckets. Keep each bag to about 35 to 40 pounds so it won’t tear and you can lift it safely. Tile debris is very heavy.
- Vacuum thoroughly with a HEPA shop vac.
- Pull or drive down any leftover nails and screws.
- Check the subfloor for rot, water damage, cracks, and soft spots, especially around toilets, tubs, and dishwashers.
- Check flatness with a long straightedge. Most new flooring needs the floor flat within about 3/16 inch over 10 feet, so check your new floor’s rules.
How to Remove Tile Floor From a Bathroom
Bathrooms are the most common place people learn how to remove tile floor, and they need a few extra steps:
- Remove the toilet. Shut off the water, flush to empty the tank, sponge out leftover water, disconnect the supply line, remove the nuts from the floor bolts, and lift the toilet straight up.
- Plug the drain. Stuff a rag into the toilet flange, then cover it with tape or a plastic cap, to block sewer gas and stop debris from falling in.
- Remove the vanity if the tile runs under it, or work carefully around it.
- Protect the tub or shower with cardboard or a thick drop cloth so flying tile doesn’t chip it.
- Work carefully near the toilet flange and tub edge, using hand tools instead of power tools.
- Check for water damage around the toilet and tub once the tile is up. Soft or dark plywood should be replaced.
Small bathrooms can be cramped for a rotary hammer, so many people switch between power tools in open areas and a hammer and chisel in tight spots.
How to Remove Tile Floor From Concrete vs. Wood Subfloors
Knowing how to remove tile floor depends a lot on what the tile is stuck to.
| Factor | Tile on concrete | Tile on wood subfloor |
|---|---|---|
| What’s usually under the tile | Thinset directly on the slab | Cement backer board, membrane, or thinset on plywood |
| Best tool | Rotary hammer or power scraper, then grinder | Hand tools or rotary hammer at low angle; pry bar for backer board |
| Main risk | Heavy silica dust from grinding | Gouging or cracking the plywood |
| Finishing step | Grind smooth or use self-leveler | Remove backer board; repair or replace damaged plywood |
How to remove tile floor from a wood subfloor without damaging it: Work with hand tools or a rotary hammer held very low, and pry against the tile, not the wood. If tile sits on screwed-down backer board, remove the screws and lift the board in pieces with the tile still attached.
When it’s easier to replace the subfloor: If tile was set with thinset straight onto plywood, the thinset may bond so well that scraping it off destroys the wood. In that case, many pros cut the floor into sections with a circular saw set to the plywood’s depth (avoiding joists, pipes, and wires), remove tile and plywood together, and install new plywood. This can be faster and cleaner than chiseling every tile.
Planning to Re-Tile? Check the Subfloor
Once the old tile is out, you can see what was under it. Tile needs a stiff base. Many pros won’t set new tile over thin ¼-inch plywood, because it flexes and tile won’t bond well to it. A common standard is ¾-inch plywood over joists spaced 16 inches apart, topped with cement backer board or an uncoupling membrane. Fix any soft or bouncy spots before you re-tile.
How to Remove One Tile Without Breaking Others
If you only need to replace a cracked tile:
- Remove the grout around the tile with a grout saw or an oscillating tool with a grout blade. This keeps the neighboring tiles from cracking.
- Put on safety glasses. Drill a few holes in the center of the tile with a masonry or tile bit, or score an “X” across it.
- Gently break the center with a hammer and chisel, working from the middle toward the edges.
- Chip out the pieces and scrape off the old thinset so the new tile sits level.
- Set the new tile with fresh thinset, let it cure, and then grout.
How to Remove Floor Tiles Without Breaking Them
Want to save the tiles to reuse? Be realistic: ceramic and porcelain tiles set in thinset usually crack when removed, so plan on saving only some of them. To give yourself the best chance:
- Cut out all grout around each tile first with a grout saw or oscillating tool.
- Work a wide, thin bolster or putty knife under the edge from all sides, tapping gently.
- Go slowly. Tiles set with mastic or over a weak bond come up whole more often than tiles in strong thinset.
- Soak old cement-based tiles, like some handmade or Saltillo tiles, with water first to soften the bond.
- Scrape the old thinset off the back of saved tiles before reusing them.
How to Remove Vinyl and Peel-and-Stick Floor Tiles
Not all “tile” is ceramic. Vinyl tiles come up differently:
- Warm each tile with a heat gun or hair dryer to soften the glue.
- Slide a putty knife or floor scraper under one edge and peel it up.
- Remove leftover adhesive with warm water, a citrus-based adhesive remover, or a floor scraper.
Test old vinyl first. Old 9-by-9-inch vinyl or asphalt tiles may contain asbestos. Home sampling kits often cost about $10 plus roughly $45 to $60 for the lab test. If they test positive, don’t scrape, break, or sand them. Some older homes have several layers of vinyl or linoleum stacked on top of each other. Each layer may need to be tested.
Can You Put New Flooring Over Old Tile Instead?
Sometimes, yes. Before you learn how to remove tile floor, ask whether you need to. Tearing out tile isn’t always necessary.
- Good candidates: Tile that’s firmly stuck, level, and not cracked. Floating floors like vinyl plank or laminate can often go right over it. New tile can sometimes be set over old tile with the right prep.
- When to remove it: Loose, hollow-sounding, or cracked tiles; damaged subfloor; water damage; or when added height would cause problems with doors, appliances, cabinets, or transitions to other rooms.
How to Cover Old Floor Tiles Without Removing Them
- Floating vinyl plank or laminate: Clicks together right over flat, solid tile.
- Self-leveling compound: Pour a thin layer to fill grout lines and create a smooth base, then install new flooring on top. You may need to trim the bottoms of doors or the kick plates of kitchen cabinets.
- New tile over old tile: Possible if the old tile is solid; it needs cleaning and a special primer or bonding thinset.
- Tile paint or floor coating: A budget option for low-traffic rooms, though it wears faster than new flooring.
- Peel-and-stick vinyl: A quick, temporary update, though grout lines may show through over time.
Going over tile saves time, money, and dust, but it raises your floor height. Check door clearances and appliance fit, such as under dishwashers, before deciding.
DIY vs. Hiring a Pro: Cost Comparison
| Cost item | DIY | Professional |
|---|---|---|
| Labor | Your time (often 1 to 2 days for a typical bathroom or kitchen) | Often about $2 to $6 per sq ft; more for mud beds or backer board |
| Tools | About $50 to $250 to buy or rent | Included |
| Debris disposal | Bags for trash pickup, a rented dumpster bag, or a small roll-off dumpster (often about $150 to $500+) | Often included or added as a fee |
| Thinset grinding | Grinder rental plus your time | Often added cost per sq ft |
| Asbestos abatement (if needed) | Not a DIY job in most cases | Varies widely; often several dollars per sq ft or more |
Rough national ranges. Get local quotes, since prices vary by area and job.
Prices have gone up over time. A few years ago, some contractors quoted as little as $1.50 to $2 per square foot plus dumping fees, but today’s prices are often higher, especially for backer board, mortar beds, and grinding.
Example: Removing tile from a 100-square-foot bathroom might cost about $200 to $600 or more with a pro, versus around $100 to $300 in rentals and disposal if you do it yourself.
When to Hire a Pro
Even if you know how to remove tile floor yourself, some jobs are better left to a pro:
- The tile or adhesive may contain asbestos.
- The room is large, or the tile is set in a thick mortar bed.
- There’s radiant floor heating you want to keep.
- You have back, knee, or breathing problems.
- You need the subfloor repaired or leveled for new flooring.
How Long Does It Take to Remove a Tile Floor?
| Area | With hand tools | With power tools |
|---|---|---|
| Small bathroom (40 to 60 sq ft) | About 4 to 8 hours | About 2 to 4 hours |
| Kitchen (150 to 200 sq ft) | About 2 to 3 days | About 1 day |
| Large open area (500+ sq ft) | Not practical | About 2 to 3 days, or less with a power scraper |
Add extra time for removing backer board, grinding thinset, and hauling debris. Times vary a lot depending on how well the tile is bonded.
Are Tile Floors Hard to Remove?
It depends on how the tile was installed. Tile over a weak or failing bond, or set in mastic, can come up fast. Tile in strong thinset on concrete, tile on a thick mortar bed, and small mosaic tiles take much longer. Expect hard, physical work either way. The right tools make the biggest difference: a rented rotary hammer can turn a multi-day job into a single day.
How to Get Rid of Old Tile
Tile debris is very heavy. Tile, thinset, and backer board can weigh several pounds per square foot. A 100-square-foot floor can easily produce 500 pounds or more of debris.
- Curbside trash: Some cities accept small amounts in bags or buckets. Check local weight limits.
- Dumpster bags or small dumpsters: Good for larger jobs. Ask about weight limits, since heavy debris costs more.
- Construction debris recyclers: Some take tile and concrete for crushing and reuse.
- Junk removal services: Convenient if you don’t want to haul it yourself.
- Reuse: Whole tiles in good shape can be donated to building material reuse stores.
Common Mistakes When Learning How to Remove Tile Floor
- Skipping asbestos testing on older tile and black adhesive
- Not wearing eye protection or a respirator
- Letting dust spread through the house by leaving doors open and HVAC running
- Holding the chisel or rotary hammer too steeply and gouging the subfloor
- Prying against walls or cabinets without protection
- Overfilling trash bags until they tear
- Leaving thinset ridges that cause new flooring to crack or rock
- Forgetting to check for radiant heat wires before chiseling
- Underestimating how heavy the debris is
Frequently Asked Questions
How to remove tile floor at home: what is the best way?
Clear and seal the room, wear safety gear, break a starting tile, then work under the tile edges with a chisel, floor scraper, or rented rotary hammer held at a low angle. Finish by removing backer board or thinset so the subfloor is flat.
How do you remove tile floor without damaging the subfloor?
Keep your chisel or scraper bit at a low angle, about 30 to 45 degrees, and work under the tile edges instead of pounding straight down. Use hammer-only mode on a rotary hammer and let the tool do the work. If tile was set straight on plywood and won’t come up cleanly, replacing that plywood may be easier.
What is the easiest way to remove tile floor?
For most rooms, a rented SDS-plus rotary hammer with a wide tile chisel or scraper bit is the easiest option. For very large areas, a walk-behind power floor scraper is fastest.
Can I remove a tile floor myself?
Yes, most homeowners can remove a tile floor with basic tools and safety gear. Hire a pro if the tile or adhesive may contain asbestos, if it’s set in a thick mortar bed, or if the area is very large.
How much does it cost to remove a tile floor?
Professional removal often costs about $2 to $6 per square foot, plus disposal. DIY removal usually costs about $100 to $300 for tool rentals and disposal for a small room.
How do you remove thinset from concrete?
Scrape off what you can with a floor scraper or rotary hammer, then grind the rest with an angle grinder and diamond cup wheel connected to a HEPA vacuum. For small leftover amounts, self-leveling compound may work instead.
Do I need to remove old tile before installing new flooring?
Not always. If the tile is solid, flat, and not cracked, floating floors like vinyl plank and laminate can often go over it. Remove it if it’s loose, damaged, or if added height causes problems.
How can I tell if my old floor tile has asbestos?
You can’t tell by looking. Tile and adhesive installed before the 1980s, especially 9-by-9-inch tiles and black adhesive, should be tested by an accredited lab before you disturb them.
What is the best tool to remove tile flooring?
For most DIY jobs, a rotary hammer with a wide tile chisel or scraper bit is best. Use a hammer and bolster or cold chisel for small areas and edges. For large concrete floors, a power floor scraper or air chisel is fastest.
How can I cover old floor tiles without removing them?
Install floating vinyl plank or laminate over solid, flat tile, or pour self-leveling compound and lay new flooring on top. New tile can also go over old tile with proper prep.
How long does it take to remove a tile floor?
A small bathroom often takes a few hours with power tools. A kitchen usually takes about a day, plus extra time for removing backer board, grinding thinset, and cleanup.
Final Thoughts
Now you know how to remove tile floor safely and efficiently. Test older tile and adhesive for asbestos, control dust, and wear proper safety gear. Prep the room, start from a broken tile or edge, and work under the tiles at a low angle with a chisel, floor scraper, or rented rotary hammer. Then remove backer board or thinset so the subfloor is clean and flat.
For small rooms, this is a manageable DIY weekend project. For large areas, thick mortar beds, or possible asbestos, hiring a pro is worth the cost. Either way, taking time to prep and finish the subfloor properly will give your new flooring the best possible start.